Cisco RVS4000 DrayTek Vigor 3900 VPN IPSec
In this example we are going to fashion a VPN from a Cisco RVS 4000 VPN router sitting behind a home ISP router/firewall just to show that VPN for your home users isn't difficult to set-up, even if you are segregating part of their network for just their work hosts, such as a desktop and printer.
The Cisco RVS 4000 VPN SoHO Router
After a full reset the Cisco will have the IP range 192.168.1.1/24 and as this will very likely be the subnet your workers will have at home it is best to choose something else. In my example here I am just sticking with 192.168.1.0/24 because the network I am plugging into has a different range but you get the idea.
To start with We are going to configure the Cisco before the users take it away.
As I said I am starting with a fully reset router - you will obviously want to adjust the password and rig up any remote administrative features beforehand in case the VPN does not come up straight away.
Now we move on to configure the VPN.
Go to the VPN Ipsec page of the router and enter the relevant details:
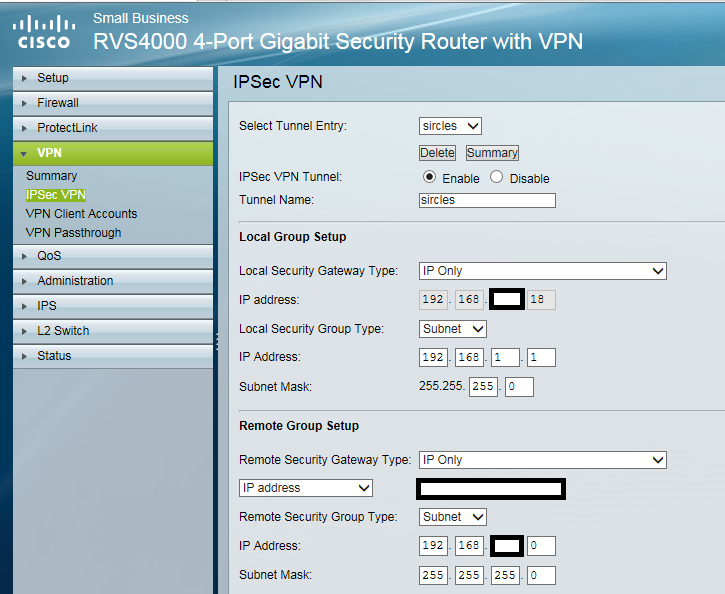
In the above we are configuring the VPN as an IP only gateway only as this will allow the VPN to connect easily from the home environment.
The enabled option has been chosen and the destination office chosen as a name for the VPN
Local security type is Subnet and the IP address is the IP address of the Cisco router LAN port
In this case the internal network of the Cisco RVS 4000 will be 192.168.1.0/24 but in your case it may well be best to choose an alternative as mentioned earlier.
The subnet mask is a class C of 255.255.255.0 as normal on a home network.
Next we are configuring the remote network behind the DrayTek Vigor 3900, the gateway is the external WAN IP address associated with the VPN you are connecting to.
The IP address and subnet mask are the internal network for the DrayTek router, in this case another Class C network.
We move down the page...
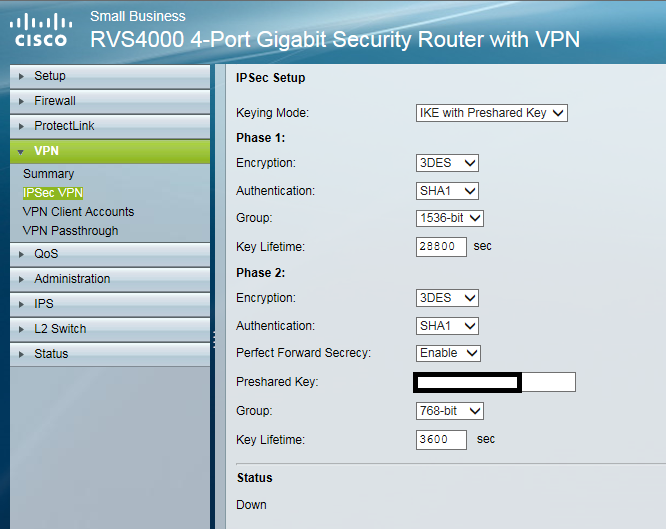
We are choosing IKE with preshared key
We select 3DES encryption for phase 1 as this is the best that the Cisco will do but if you are using a later model, feel free to select AES256 if you have it.
Phase 1 authentication is being set to SHA1
We select Group 5 1536-bit authentication and leave the key lifetime at 28800 as this is also the DrayTek default
Phase 2 we set as 3DES, SHA1, enable PFS and enter the preshared key. The authentication has been left at Group 1 768-bit for 3600 seconds.
We move down to the 'advanced' settings:
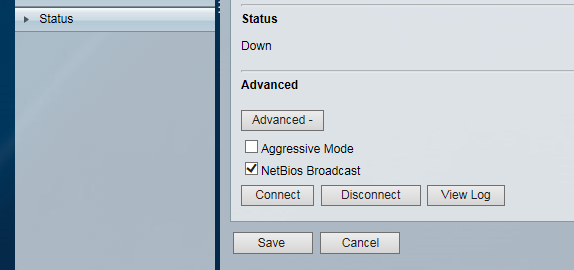
We are setting NETBIOS broadcast as on just to keep the machine naming up-to-date on each network for Windows machines.
Now we move onto the DrayTek Vigor 3900.
Once logged into the device, we are setting a new IPSec profile under VPN and Remote Access > IPSec Profiles
Choose to create a new profile and you are presented with the new IPSec profile dialogue:
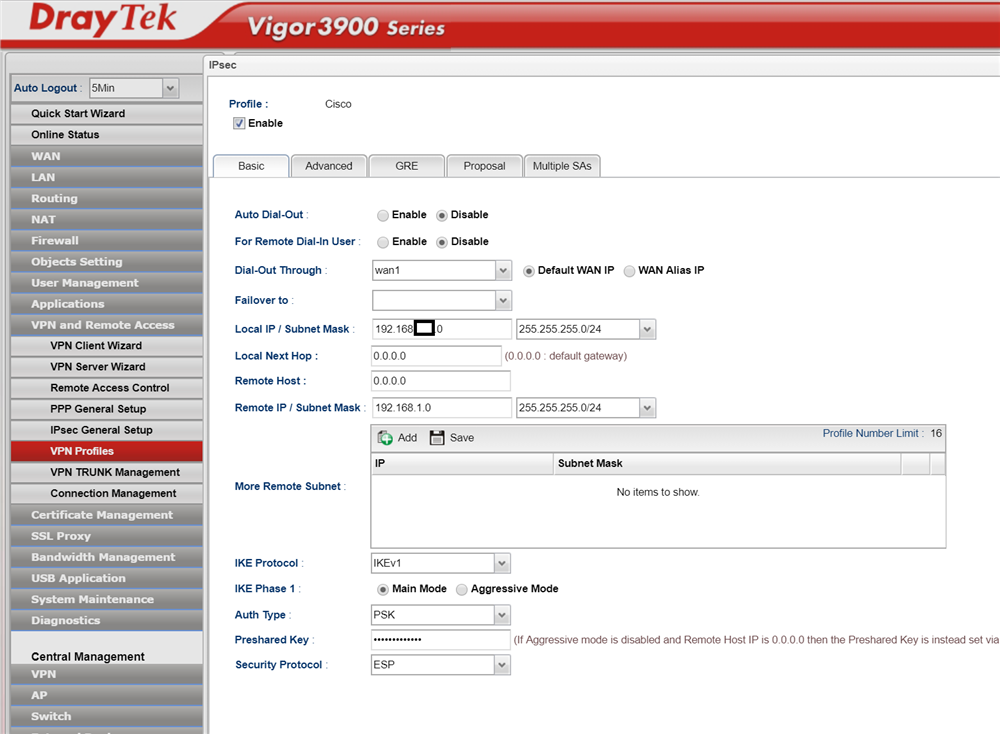
We tick the Enable box at the top to enable the profile.
We can leave the first two boxes as we are receiving only and expecting a router rather than a user.
In this case the DrayTek is expecting the VPN at the IP address associated with WAN1 so we leave that.
The local IP Address/Subnet mask are the same as those we set as the remote network details on the Cisco and represent the internal network we are granting access to the Cisco router network.
The Local Next Hop and Remote Host can remain as they are as the home user network will almost certainly have a dynamically assigned IP address.
The IKE protocol and Phase 1 settings can remain as defaults
Auth Type is set to PSK - Pre Shared Key and enter the same key as you entered into the Cisco earlier.
The security protocol is set as ESP
Now we moved onto the second page:

We are leaving the Phase 1 & 2 lifetimes as they are as they already match the Cisco - you should update these to be the same as yoru Cisco settings if you chose other than default periods.
Perfect Forward Secrecy (PFS) is on
All the other settings can remain as they are, except that once again we are setting NetBIOS naming packet as on.
Apply and save the changes.
Now looking back at the Cisco, we click the connect button under VPN status to connect:
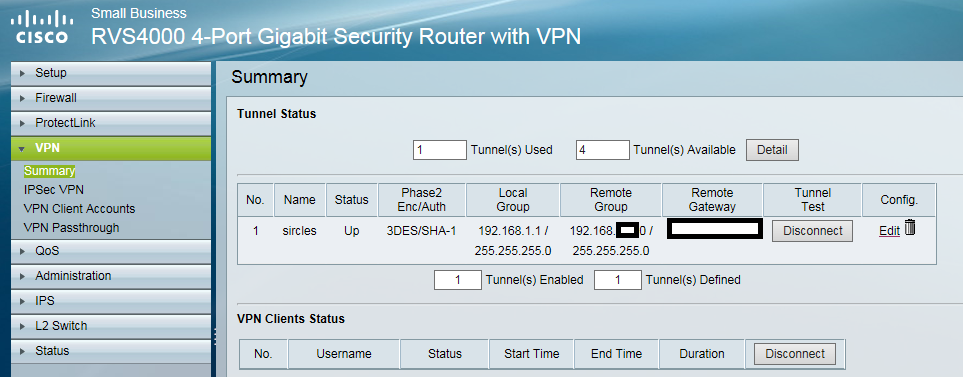
We can see from the above a network VPN has been established.
And from the machine we are using, we can ping the remote 192.168.x.0 network...