DrayTek Vigor 2830 Dynamic IP to 3900 Static IPSec VPN
There are two main points to bear in mind when configuring the dynamic IP address connections to a static Vigor. The first is that you need to configure the IPsec shared key in two places on the static host DrayTek Vigor VPN router. Firstly under IPSec General Set-up (which is the same place as you configure the IPSec key for L2TP) and then under the VPN Profiles (or LAN to LAN if it is an older model.)
Lets configure the DrayTek Vigor 3900 static IP host router first:
Go to IPSec General Setup:
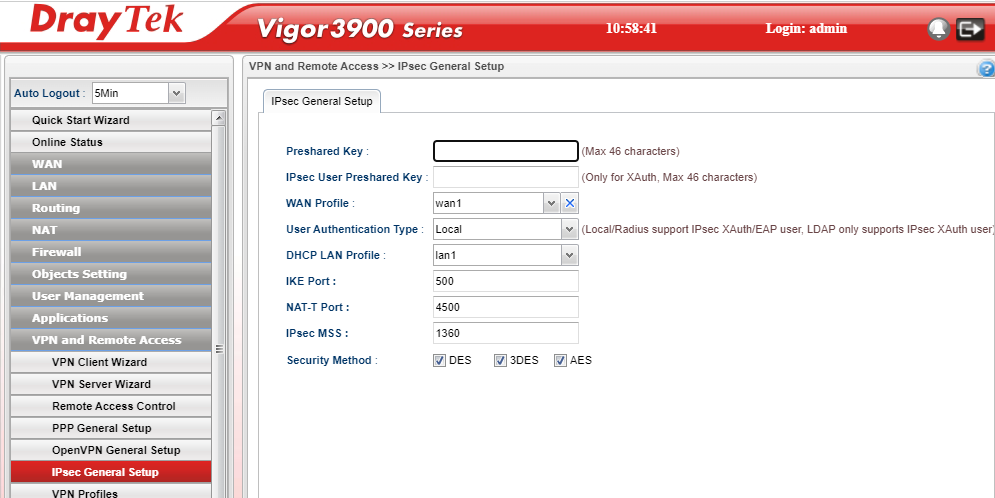

Enter the IPSec shared key you are going to use for your VPN, or if you are already using that shared key for other connections, look up what you are using and make a not of it as we will need to enter that shared key again shortly.
Now go to VPN Profiles and we will configure the IPSec specifics for the host static end of the VPN. To continue, click Add to open a new profile window and choose an IPSec VPN. Leave the 'For remote dial-in user' selection at disabled.
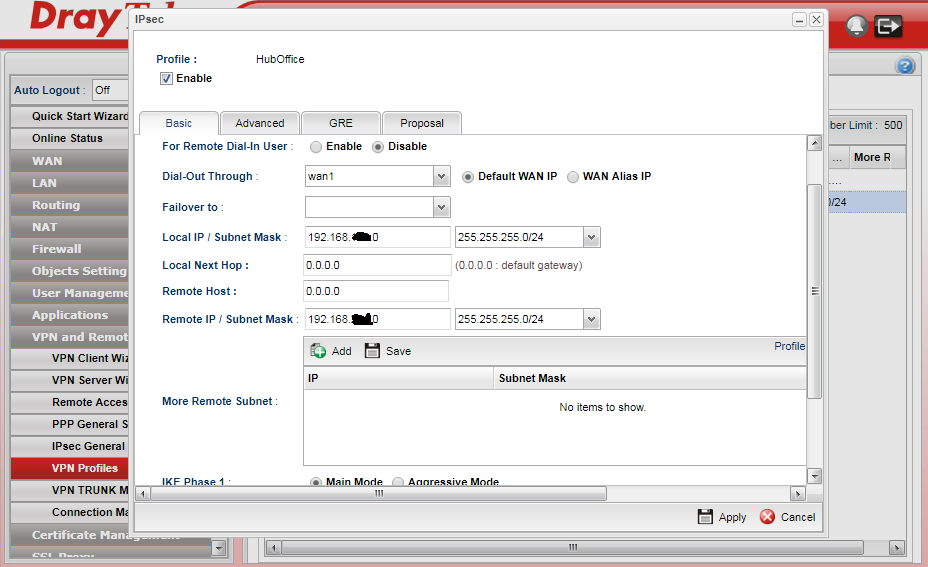
So in the above we use the wan port that the external IP being targeted by the other VPN router.
The local IP/Subnet mask is the IP range used by the internal network of the 3900 with the static external IP. In this case we are using a class C subnet of 192.168.x.0
The local next hop is left as the default to use the wan1 default gateway (in the above we are using wan1 but as stated you must use the external IP that the 2830 is pointed towards)
The remote host remains at 0.0.0.0 as the remote Vigor 2830 is on a static IP
The remote network mask is the internal IP LAN subnet of the 2830 with a dynamic WAN address - in this case we are using another 192.168.x.0 address
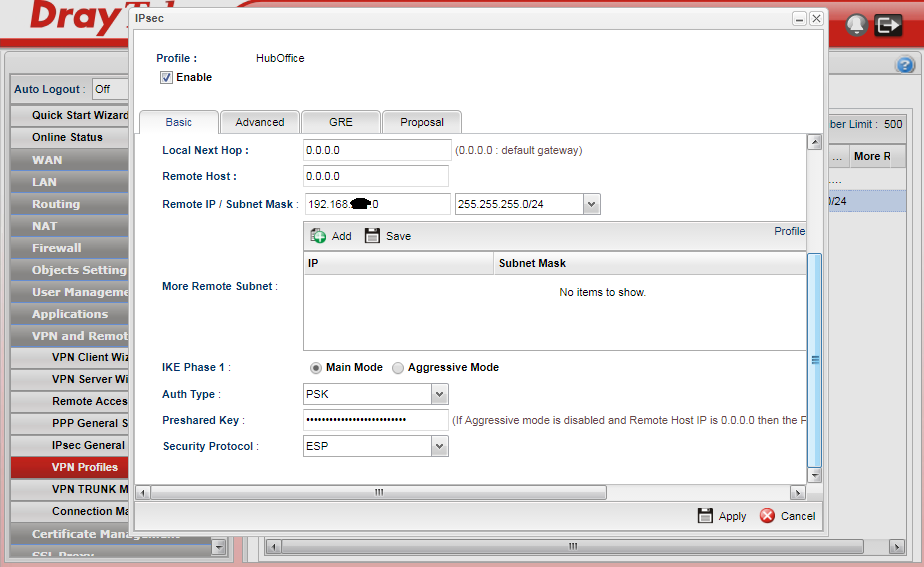
For the IKE phase 1 we will stick with Main Mode
The authentication type we will leave as PSK - Pre-Shared Key
The pre-shared key we entered earlier we enter again here...
The security protocol we are choosing is encrypted and so we select ESP
Now we move onto the Advanced tab:
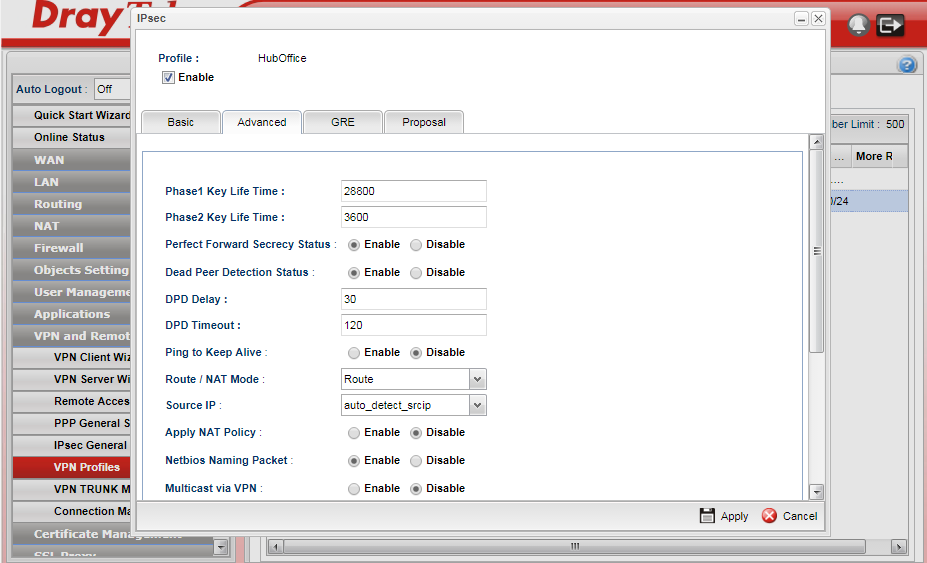
We are sticking with the default time-outs for DrayTek Routers.
We are selecting Perfect Forward Secrecy to be enabled (PFS)
Dead peer detection can be enabled to allow for VPNs to be picked up again quickly after a brief connectivity issue.
Route/NAT mode should be: Route
Apply NAT policy should be: Disable
NetBIOS naming packets in this case I am selecting: Enable as this will allow ICMP traffic for Windows client/server communications to behave as if on the same network.
Multicast via VPN we will leave: Disabled
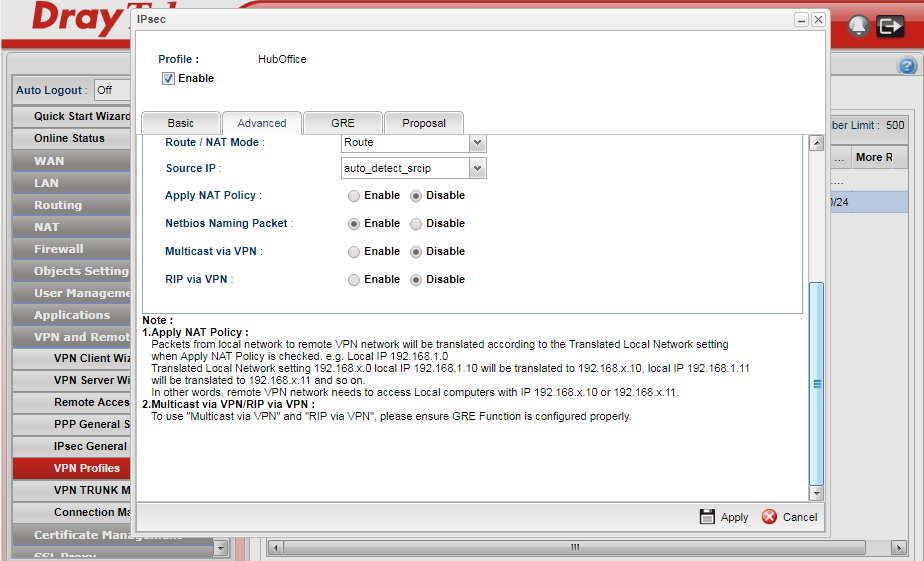
RIP via VPN we will leave: Disabled to simplify getting the VPN up and running - you may wish to enable this at each end afterwards for router discovery.
Now we proceed to the Proposal Tab as we are not enabling GRE in this example:
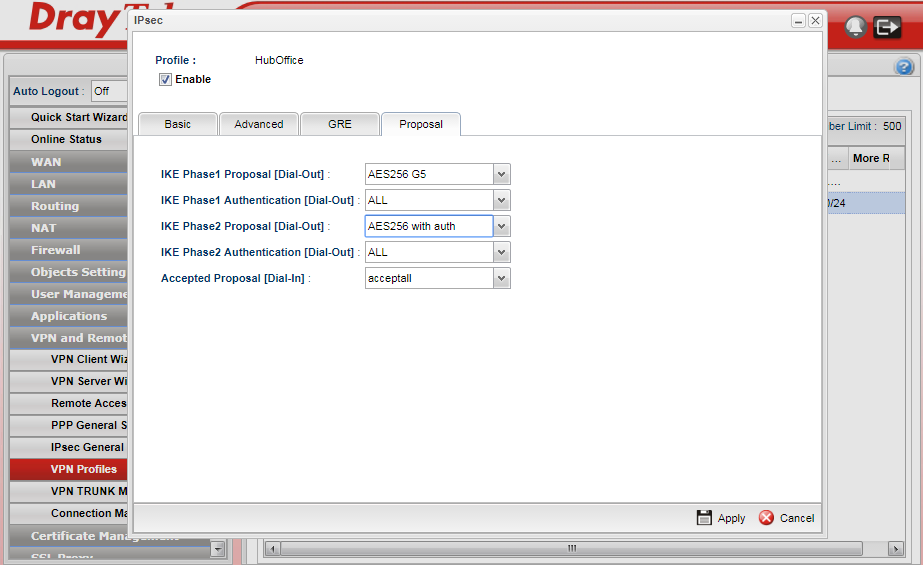
Now we configure the encryption methods:
We are using AES G5 (Group 5) and AES with authentication as above and leaving the other options as accept all to bring the VPN up reliably and quickly.
To enable compatibility with the 2830 we are sticking to Group 5 but if you are using a 2860 you can use Group 14 (G14) instead as long as you match both ends.
Once all of this has been entered we can click Apply and await the router to confirm that it has accepted our VPN details...
Now we configure the 2830
In this example we are going to stick with using the LAN to LAN or VPN profiles tab as not all models have the VPN client and server wizard options, but either method will work as long as you get all of the encryption, LAN and endpoint data correct:
Below we have already gone to VPN>LAN to LAN and clicked on a profile number to start entering the data:
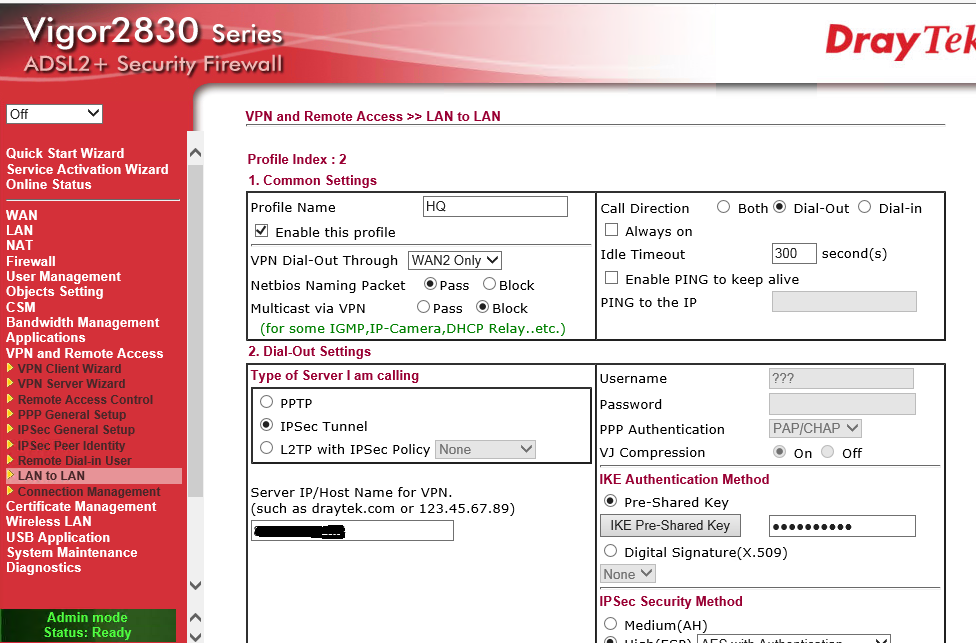
Give your profile a name and tick the box to enable it.
On this router we are using WAN 2 as it is behind another router (and yes it will still work with or without passthru as this is a dial out only configuration from the dynamic end. There is no point trying to dial back to a router you do not know the WAN IP address of.)
We are selecting the VPN type as Dial-Out only. If you wish the VPN to allow for full time connection so that you can access the remote computers then be sure to tick 'Always On' and Enable Ping to Keep Alive and use the IP address of the remote router LAN port on the other internal network (in this case the LAN port IP of the Vigor 3900.) This will basically make the VPN permanent allowing you to easily administer the computers at the dynamic WAN IP site where the 2830 is located.
Once again we are enabling the NetBIOS packets tick box.
Multicast via VPN is disabled again.
We enter the Vigor 3900 WAN IP/Host name in the server IP/Host Name box.
Click the IKE Pre-Shared and enter the same Pre-Shared key as before and click OK
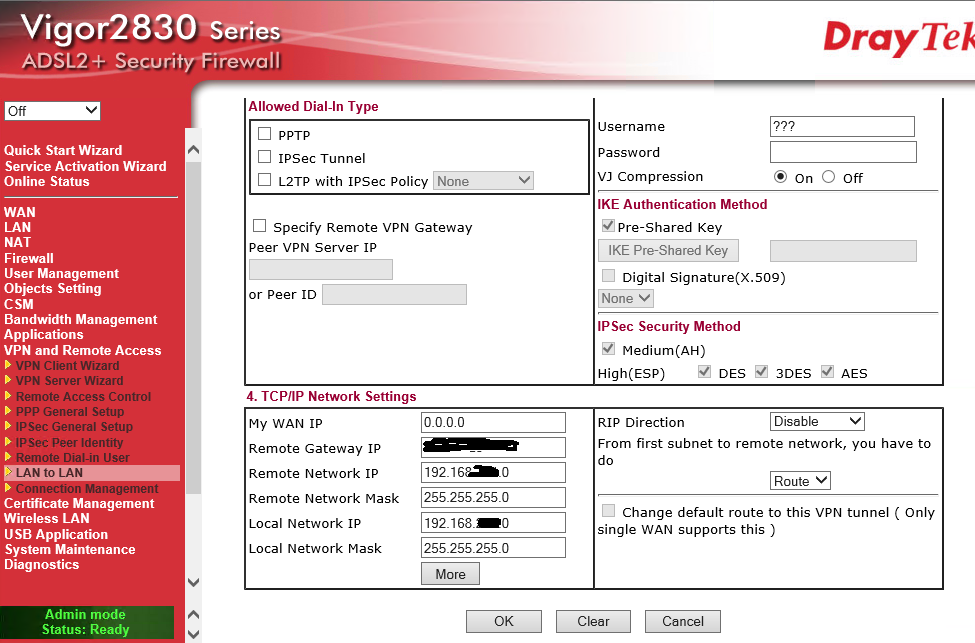
Leave the dial in boxes empty as nothing can dial into a dynamic WAN router.
Do not specify the other end of the VPN as it is a dynamic IP address.
Leave the IKE authentication box as it is as there is no dial in IKE
My WAN IP should remain 0.0.0.0
The remote VPN gateway is the WAN IP of the 3900 static IP router
The remote Network IP is the subnet of the remote 3900 static IP router, in this case 192.168.x.0 and the remote network mask is a class C of 255.255.255.0 in this case which is the LAN subnet of the 3900
The Local Network IP is the LAN subnet of the router you are configuring and the subnet is once again a class C of 255.255.255.0
We are leaving RIP as disabled and Route as the method of traversal between subnets.
Now we can click OK and go to the VPN connection management page to see how our VPN is getting on:
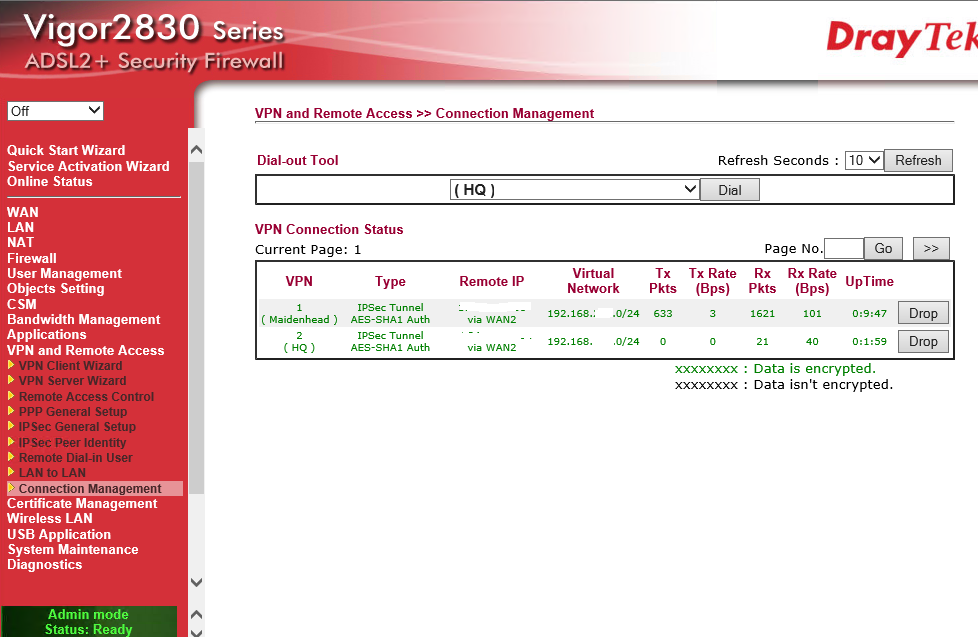
On the 2830 the HQ VPN has come up and will stay up as we have configured 'always on' and 'ping to remote IP' meaning that when the IP changes at the 2830 WAN it will pickup and stay up allowing us to configure the remote router and PCs securely if we wish.
Now on the 3900 status we see:
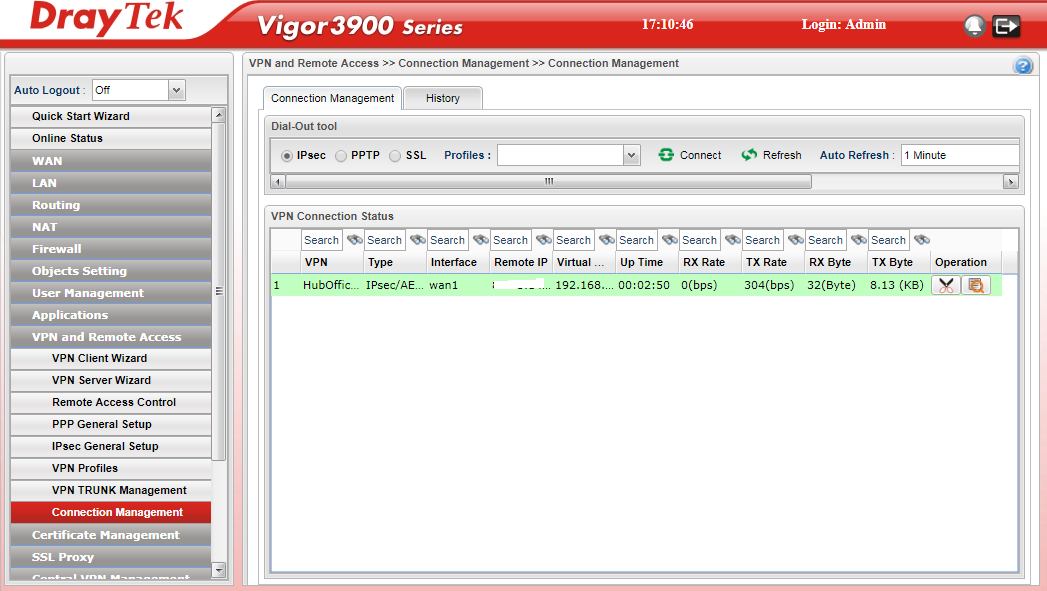
Where the VPN is showing happily at the other end also proving that the VPN is encrypting data and sending and receiving successfully.
Buy the DrayTek Vigor 2860
Buy the DrayTek Vigor 3900