DrayTek Vigor 2860 VPN Dynamic IP to DrayTek Vigor 3910 Static IP Using IPSec

The first thing to note here is that the DrayTek Vigor 2860 does not support IKEv2 like the 3910 or 2962 does.
This means that we will be using IKEv1 with IPSec shared secret PSK for set-up.
We will be using the highest AES encryption that the 2860 will support.
Firstly, let's go over the IP issue. In this situation, the remote office behind the 2860 has a 5G card for when the connection drops or has a problem. For this reason we will not be specifying the IP from which the 2860 can connect, as the 5G card receives a dynamically assigned IP address when connecting. Because of this we will be choosing a very complicated PSK to avoid any security breaches.
Firstly, let's start with the 2860
We go to VPN & Remote Access > LAN to LAN and choose a blank profile by clicking on a number
We are configuring the system as thus:
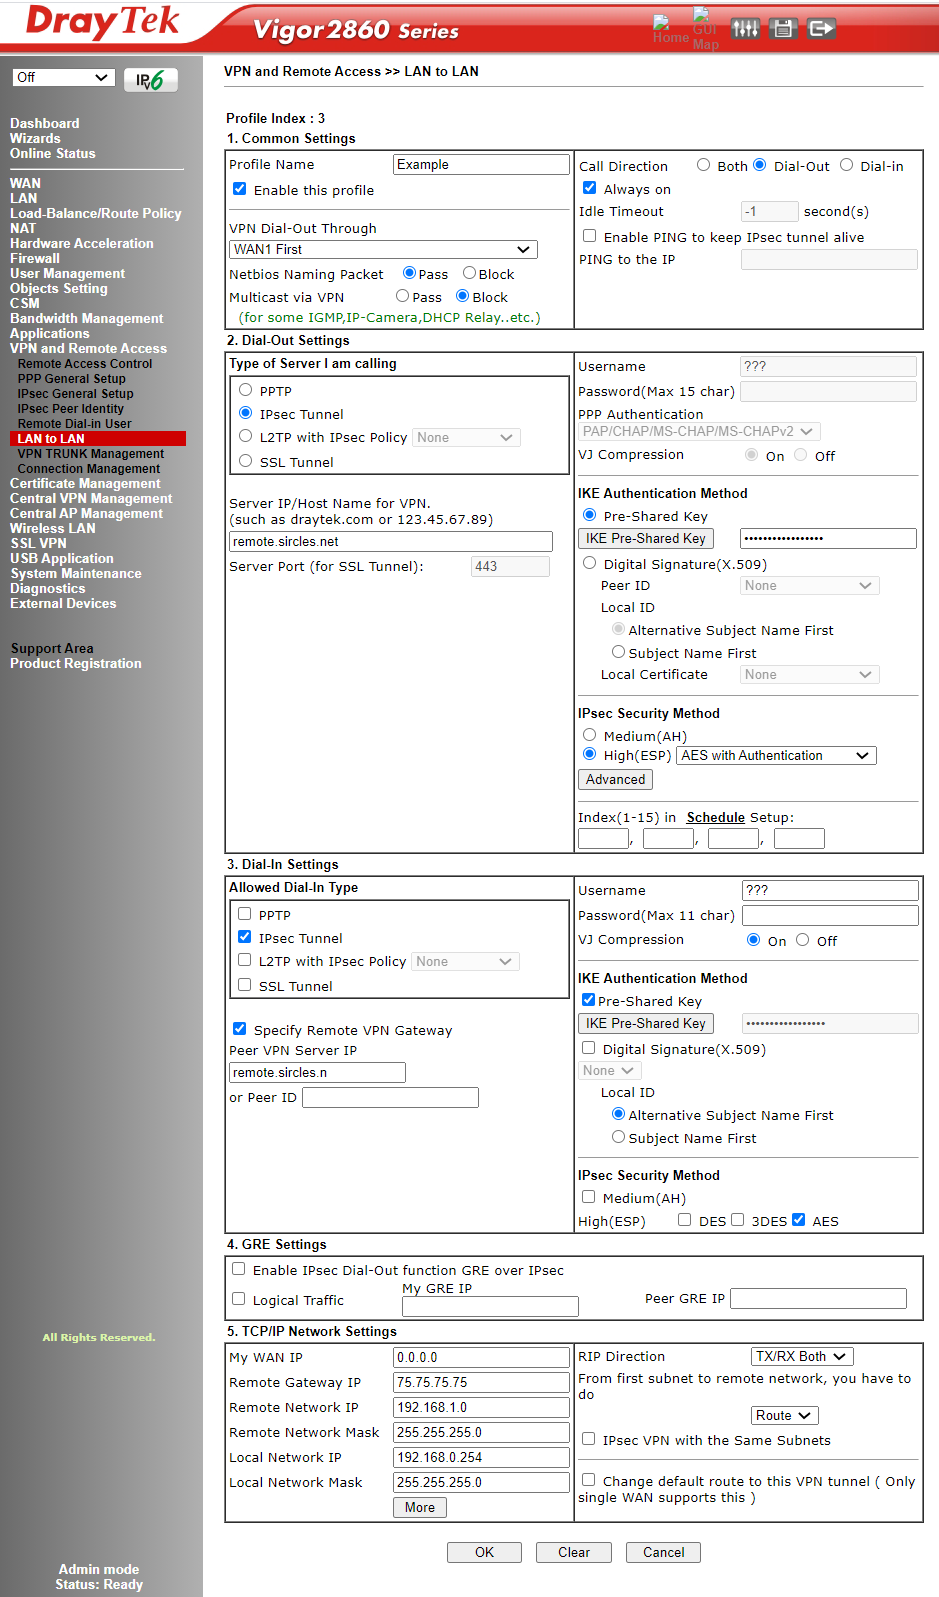
- Part 1 - Common Settings:
- Enable the profile with the tick-box
- Give the VPN a relevant name corresponding to the endpoint
- Here we are choosing WAN1 first as the USB 5G is on WAN4
- We are ticking the always on button which changes the call direction to Dial-Out
- Part 2 Dial-Out Settings
- The server we are dialling we are setting to IPSec Tunnel
- Now we enter the external remote IP address or host name which the IPSec server (The DrayTek 3910) is listening on
- IKE Authentication Method
- Pre-Shared Key, click the button and type in the key you have chosen for the connection
- IPSec Security Method
- AES with Authentication, click the Advanced button:

- Part 2 (Continued from above):
- IPSec security Method
- Advanced
- Choose Main Mode as the phase 1 type
- Phase 1 Proposal is set to AES_256_SHA1_G14
- Phase 2 Proposal is set to AES256_SHA1
- Leave the time-outs as the 3910 will match them anyway
- Perfect Forward Secret: Yes
- Choose a name for the Local ID
- Part 3 Dial-In Section
- Select only the tick box for IPSec under Allowed Data Type
- Tick the Specify Remote VPN Gateway
- Enter the value you entered earlier for the remote host
- IKE Authentication Method
- Tick Pre-Shared Key and click the button to enter the same code for the PSK as before
- IPSec Security Method
- Part 4 GRE Settings - leave blank in this case
- Part 5 TCP/IP Network Settings
- May WAN IP - Leave at 0.0.0.0 as this is a dynamic address for this purpose
- Remote Gateway IP - the IP address of the remote WAN listening for the VPN (The 3910)
- Remote Network IP - the internal subnet of the remote 3910 you are connecting to
- Remote Network Mask - the subnet mask of class c or whichever
- Local Network IP - your local subnet of the LAN - in this case 192.168.0.254
- Local Network Mask - the subnet of the local LAN
- RIP direction - not relevant for this as there are no further subnets
- Leave the next box as Route
- Click OK
Now for the DrayTek Vigor 3910 VPN Set-up
Firstly set the IPSec general PSK under IPSec General Set-up:
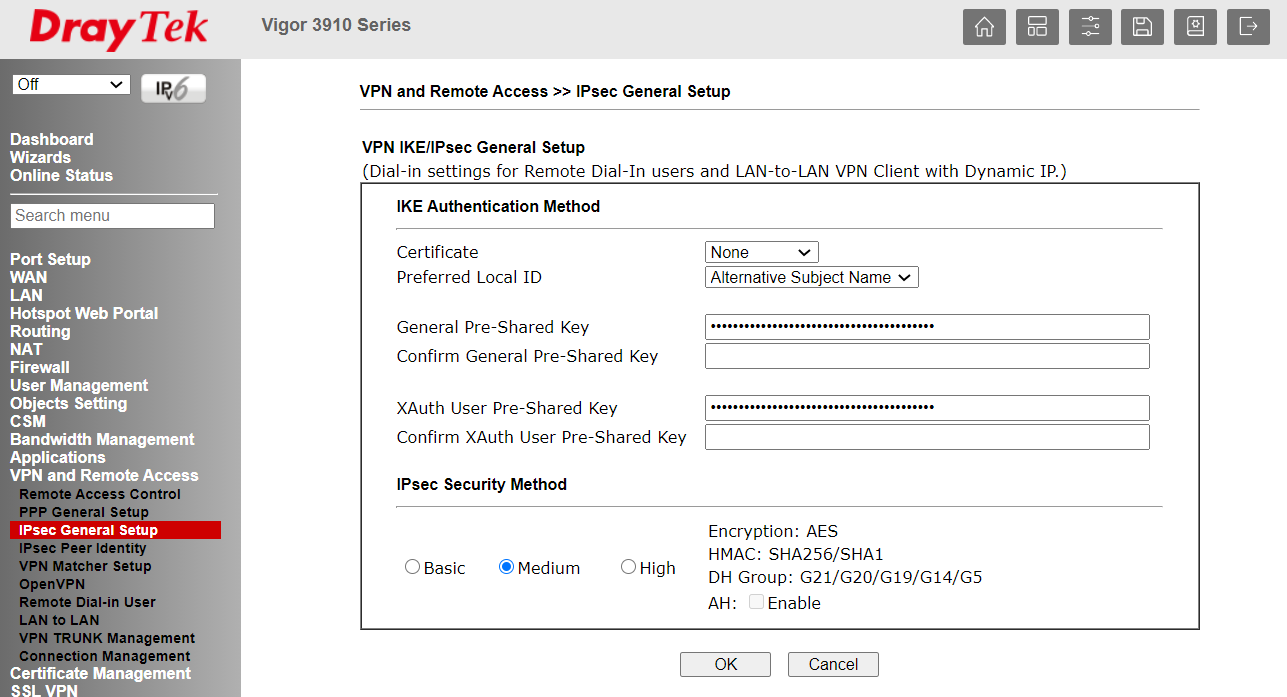
This is the PSK that all dynamic remote IPSec clients use.
Once again go to a blank profile under VPN and Remote Access > LAN to LAN
We are configuring the system as:
Note that this is a dial-in set-up only and we do not configure any of the dial-out settings, except that we have to add the PSK to make it work.
- Section 1- Common Settings
- Enter the Profile name as before with attention to which endpoint this is.
- Tick to enable
- Choose the correct WAN interface the 2860 is pointed to
- Choose Dial-In as the call direction
- Section 2 - Type of server I am calling
- Choose IPSec tunnel and IKEv1
- leave the hostname/IP blank
- Click the IKE Pre-shared Key button and enter the PSK as before
- In the IPSec security method choose AES with authentication and click the advanced button:

Set as follows:
- Section 2 cont...
- IKE phase 1 (IKEv1) Main Mode
- IKE Phase 1 proposal encryption - AES256
- IKE Phase 1 proposal ECDH Group - G14
- IKE Phase 1 proposal authentication - SHA256
- IKE Phase 2 proposal - AES_256_SHA1
- Leave timeouts as they are
- PFS - Enable - and choose a name
- Click OK
- Section 3 - Dial-In
- Choose the Allowed dial in type as IPSec Tunne
- Everything stays unticked or blank
- Section 4 - Ignore
- Section 5 - TCP/IP Network Settings
- My WAN IP - the WAN IP listening for the 2860 that we entered as the endpoint from the 2860
- Remote Gateway - leave 0.0.0.0
- Remote Network IP - LAN IP of the 2860
- Remote Network Mask - subnet of the 2860 LAN
- Local Network IP - LAN IP of the 3910 LAN
- Local Network Mas - LAN mask of the 3910 subnet
- Click OK - you are done.
Now you should see that the VPN comes up and you can see traffic moving between LANs.
