The DrayTek Vigor router range are very straightforward routers with which to configure a VPN and only get really complicated to work on when dealing with multiple firewall rules that may conflict or override each other. The Junipers are highly configurable in a a very ordered manner, but this does mean that there are extra considerations and stages to configuration when programming a VPN.
The Juniper needs to be told to allow traffic through a VPN and also needs a tunnel and an endpoint configured and so let us deal with that first.
We are assuming that you already have access to the Juniper via the web browser and can reach the configuration screens.
Go to the Network menu and select Interfaces and List.
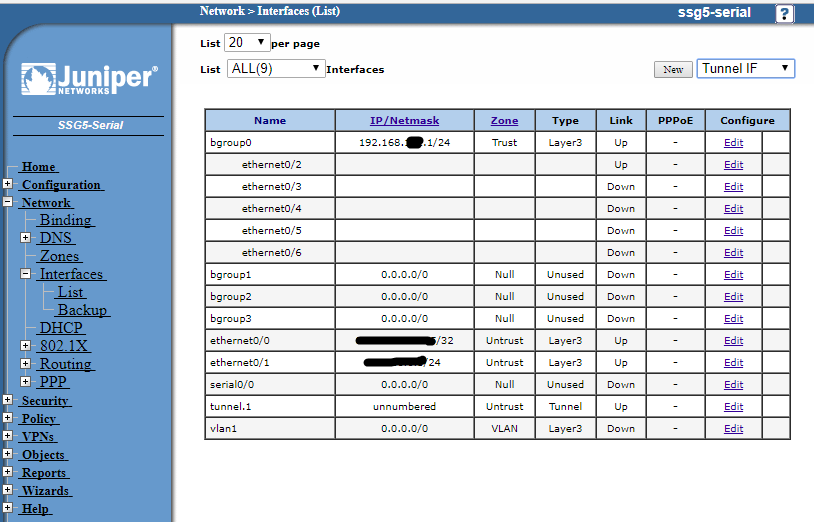
Now with the drop down top right, choose Tunnel IF and then click New.
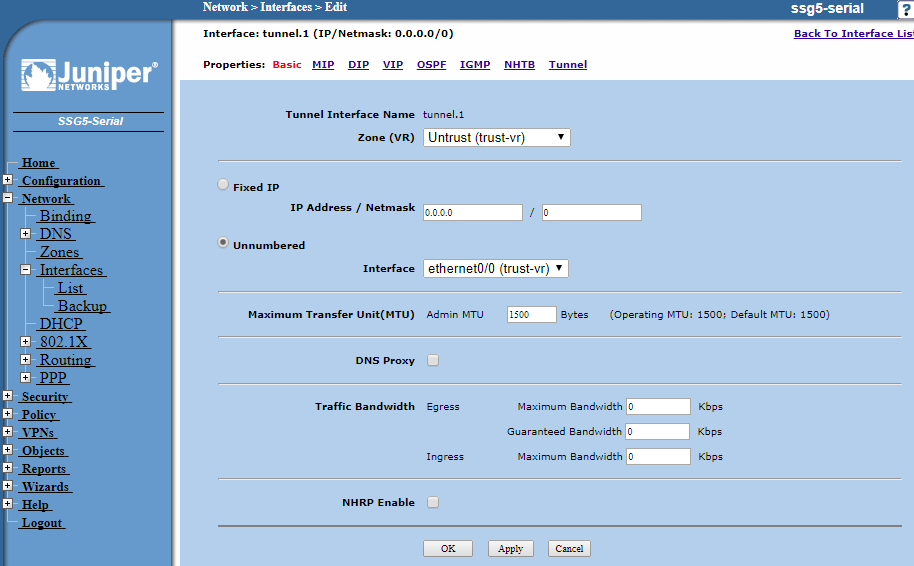
Set the Zone to be Untrust (trust-vr)
Check the bubble for Unumbered as this is a route-based VPN
Choose the interface to be the internet facing interface with the IP address that you will be pointing the DrayTek Vigor VPN at.
Now click the Tunnel link at the right of the links at the top of your configuration panel.
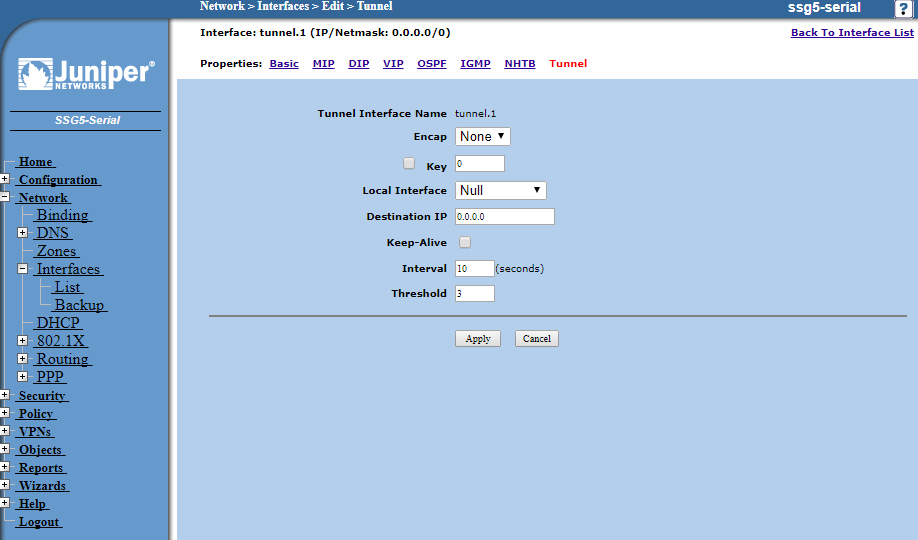
Once again the destination will be left as 0.0.0.0 as this is a route-based VPN and the Gateway we define in a minute will determine the endpoint for the VPN.
Now we have the tunnel configured we move on to configure the VPN:
Click Autokey IKE and then New:
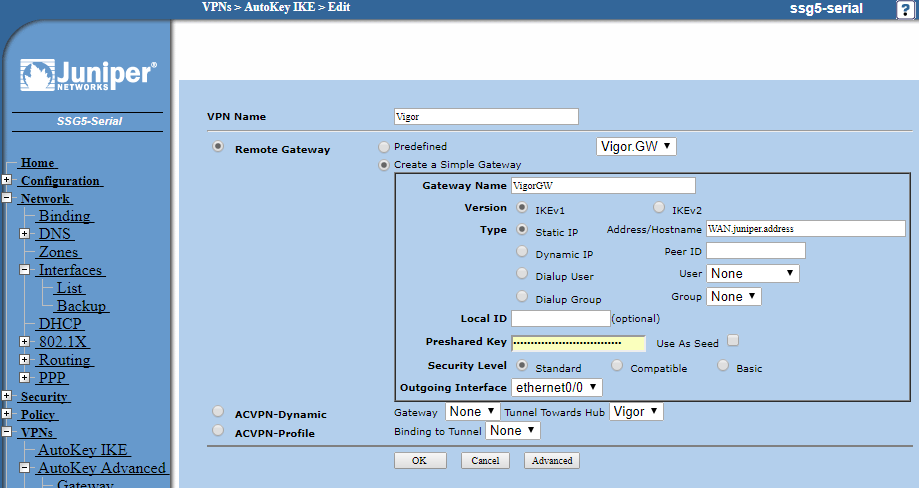
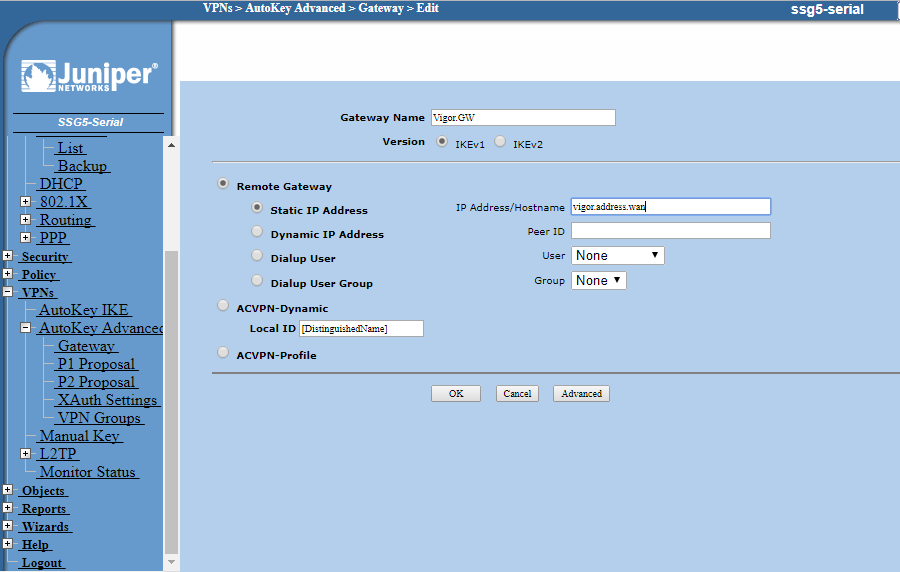
Rather than configure a gateway in advance we will simply create one in this page. Click the bubble to Create a Simple Gateway and enter a name for the remote gateway. Leave IKE as ver.1 and choose Static IP and enter the Vigor WAN IP or hostname.
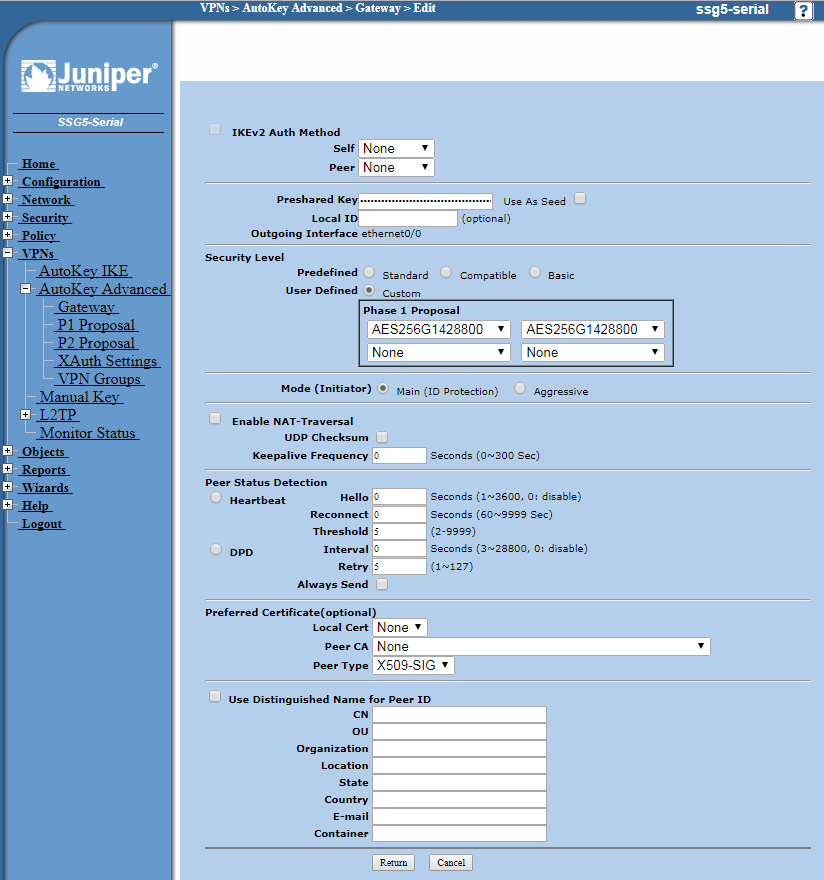
Now enter the pre-shared key which is a code that you will enter into the Vigor or share with the admin of the remote Vigor by some secure means. The Outgoing Interface will be the Juniper physical interface on which the WAN IP address resides to which you will be pointing the Vigor VPN.
Now click Advanced:
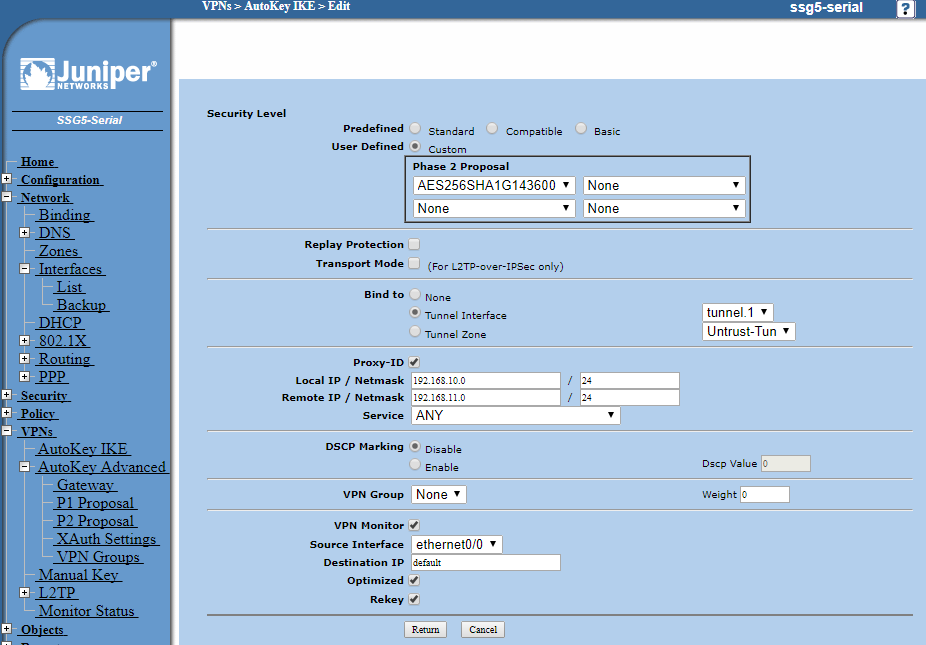
Here we are choosing the Phase 2 encryption proposal which is simply the encryption types - AES 256-bit in this case with DH Group 14 PFS (Perfect Forward Secrecy) and 3600 seconds time-out, but feel free to simply select a standard choice and make a note of what you are choosing so it can be replicated in the DrayTek.
Now enter the local and remote IP / Netmask where the local is the LAN address and the subnet and the remote is the LAN which resides behind the Vigor to which the VPN connects. In this case both subnets are set at /24 meaning 255.255.255.0 Class-C subnets, but you must enter your own details for each network.
Set service to Any which will allow all traffic to pass between the sites via our VPN.
Tick VPN Monitor, Optimised and Rekey and leave the destination as default whilst choosing the external interface to which you will point the Vigor as the Source Interface.
Now click Return and OK. Now move on to configure the policies. The Gateway settings below are just for reference.
Here are the configurations for the Gateway but these two pages have been configured already when we configured the VPN, they are included as reference if you need to troubleshoot your Gateway settings:
Now click Advanced:
Now we must configure the policies to allow traffic between the sites. Go to Policy then Policies and at the top select from Trusted to Untrusted and click New.
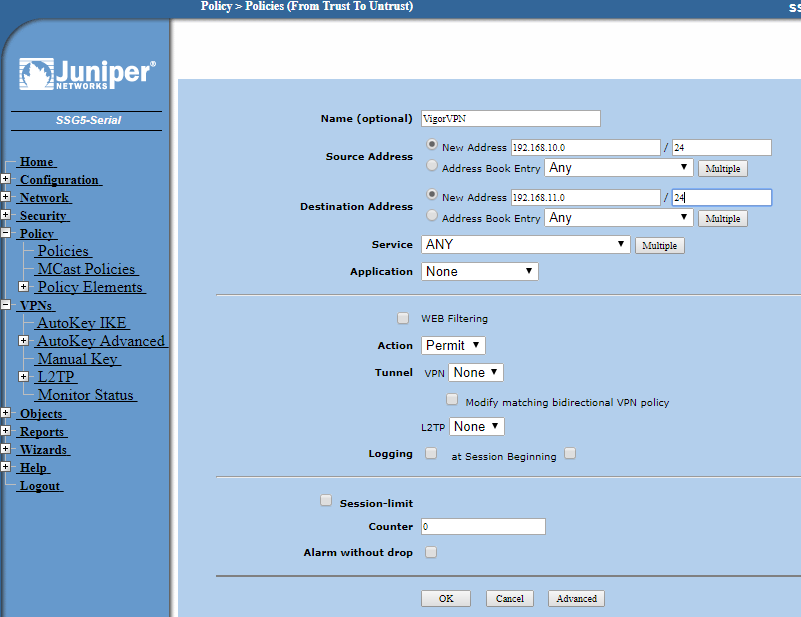
Give the policy a name and enter the local subnet in the source and the remote subnet in the destination address boxes.
Choose the service type as Any and click OK. There is no need to configure advanced options in this instance.
Now at the top of the policy screen, select from Untrusted to Trusted and New and configure the settings as above but with the Vigor remote LAN subnet as the source and the local Juniper subnet as the destination with the service set as Any.
This completes the Juniper set-up and we can now configure the DrayTek Vigor 2862.
Log into the admin web page of the DrayTek and go to the VPN and Remote Access section on the right-hand side. Click on LAN to LAN and then click an empty profile so that you can begin to populate the necessary information:
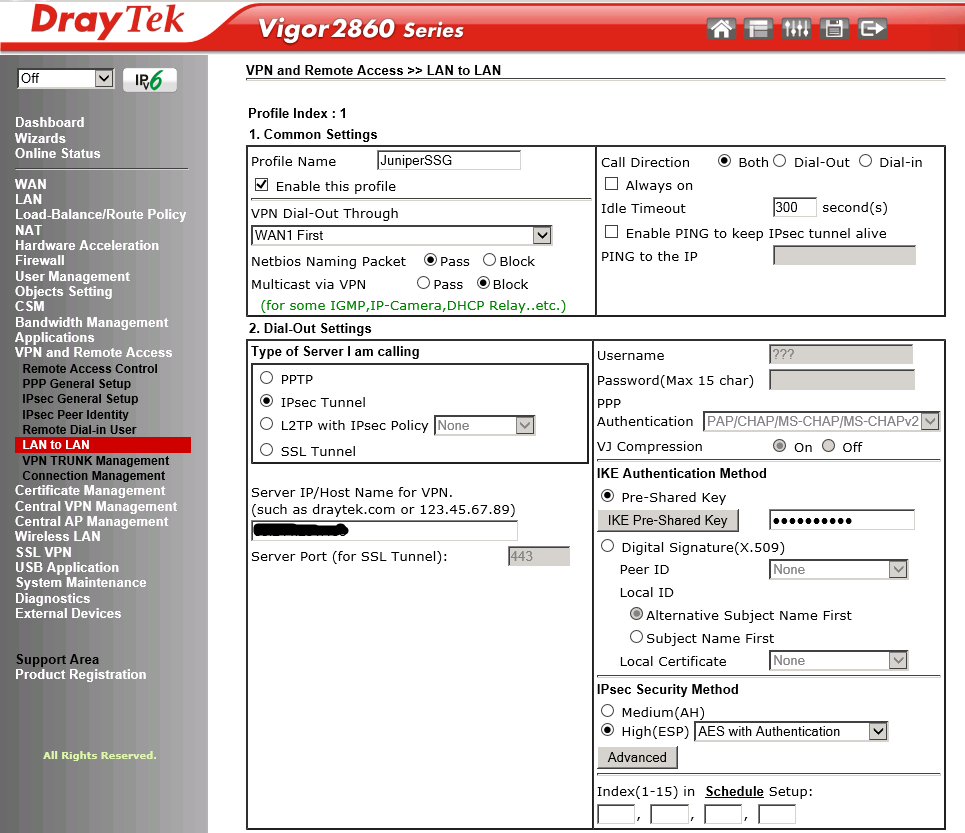
Name the VPN, indicating where it is connecting your local subnet to.
Tick to enable the profile.
Choose which WAN port/interface the VPN will be established through.
We are allowing NetBIOS naming packets as this will be for a Windows computer network and we may wish to enable inter-site computer browser functioning etc.
Multicast via VPN we will leave disabled.
Set the direction to be Both so that either site can initiate the connection.
Set the VPN type to be IPSec and enter the WAN IP or hostname of the Juniper we are connecting to.
Populate the bubble for Pre-Shared Key and click the IKE Pre-Shared Key button. Here you must enter the same key you entered into the Juniper and click OK.
Below that, choose the bubble for High(ESP) and set the dropdown box to be AES with Authentication. Then click the Advanced button:
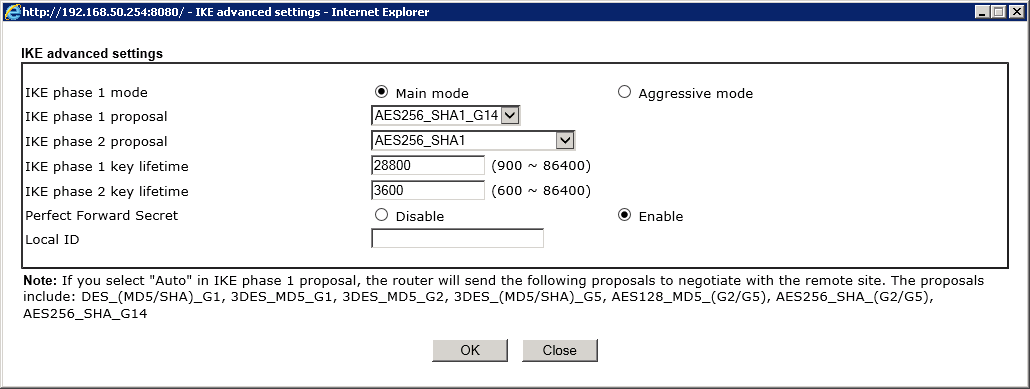
Here we are selecting Main mode as we did on the Juniper and out phase 1 proposal as AES256_SHA1_G14
Our phase two proposal is set as AES256_SHA1
Timeouts are once again 28800 seconds and 3600 seconds for phase one and two respectively and the Perfect Forward Secret (PFS) is enabled. Now click OK.
Moving down the VPN LAN to LAN page we come to the Dial-In settings:
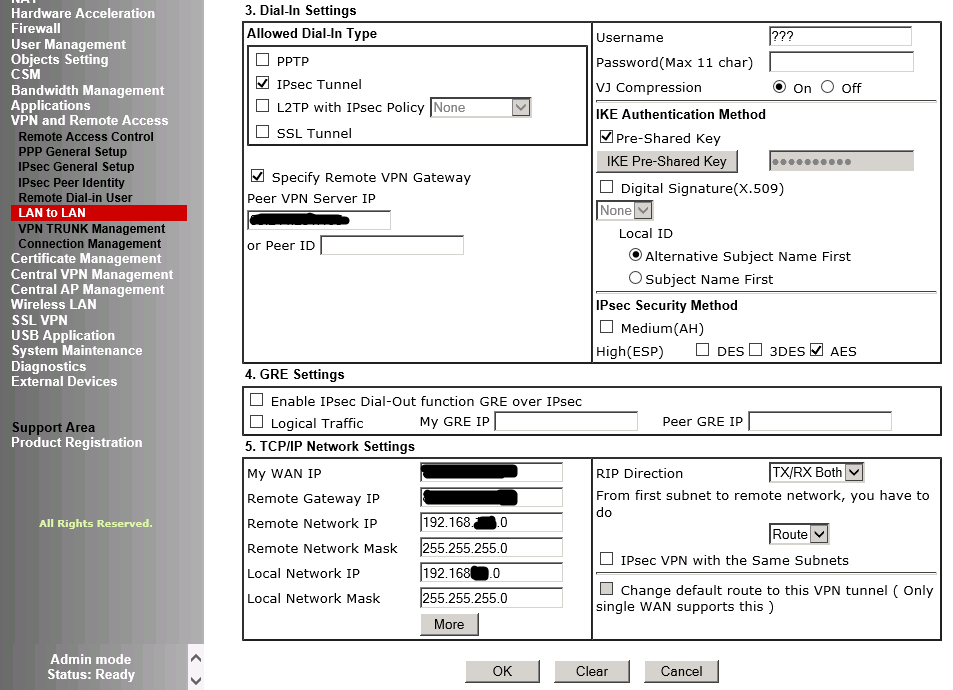
Tick IPSec Tunnel as the VPN type and untick the others.
Tick the box to Specify Remote VPN Gateway and enter the Juniper WAN IP once more.
Tick the box for the Pre-Share Key and enter it as before by pressing the appropriate button.
Tick the AES button for the IPSec Security Method.
Leave section 4 blank here as we are not using GRE in this example.
Finally section 5 we enter the Vigor WAN IP in My WAN IP. The Juniper WAN IP in Remote Gateway IP.
The Juniper LAN subnet in Remote Network IP such as 192.168.10.0 and the subnet mask below, in this case 255.255.255.0 rather than /24.
The local network IP is the LAN subnet being the Vigor such as 192.168.11.0 and the subnet for the Vigor below.
The RIP direction is set to both and the traversal method is set to Route.
Now click OK.
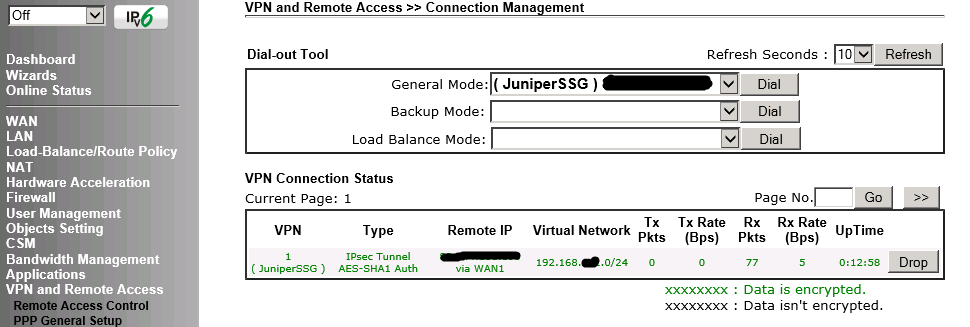
Go to VPN and Remote Access and Connection Management and see if the VPN is up:
Other VPN configuration pages: Sonicwall VPN to Draytek Vigor Cisco RVS4000 Draytek Vigor IPSec VPN