Watchguard Firebox X550e v8.3 to Draytek VPN
A DrayTek - Watchguard IPSec VPN
I would like to begin by dispelling a few myths about the way these two - particularly the Draytek Vigor - Firewalls behave. It is written time and time again on the SEG and Draytek websites that various unrelated pages of the configuration matter to both sets of configuration. These facts are often misleading and you can spend hours wondering if it is the name of your profile in the Draytek VPN configuration page that is causing your problem or that perhaps it is the name you have assigned to a Gateway Endpoint in the Watchguard, These configuration names are totally transparent to the other endpoint - they are after all security devices and do not give out data without a good reason - and so you should call them whatever you think is a convenient name.
Before you begin a configuration of a VPN using AES or 3DES over a distance bear in mind that the Firebox and other enterprise devices like the PIX or Checkpoint require licenses in order to use each piece of functionality and that if you do not have a license for an AES VPN then do not try and connect one as you will be wasting your time. If you are using a DrayTek 2800/2900 series then bear in mind that the AES these routers support on the latest firmware at time of writing is 128 bit and not 256 bit as is required by the Watchguard 550s and above so if you want to go the AES route, buy a DrayTek 3300 or 2950 (Now 2960/3900 in 2016).
First let us deal with the configuration of the Draytek as it is very simple and it will allow me to make clear what actually does make a difference in the Draytek LAN-to-LAN configuration. Firstly do not worry about the 'IPSec General Setup' page (called the VPN IKE / IPSec General Setup on the 2600 ) as this is simply for dial in users who wish to use L2TP over IPSec or are dialling in with a dynamic IP. If you are specifying the IP at each end then stick to the LAN-to-LAN configuration page.
What you will need to know:
- External IP Address of the Firewall at each end (the Real IP Address that you can get by going to 'http://whatismyip.com from each internal network
- The internal network of each network inside of each firewall - typically 192.168.x.0/24 where the /24 indicates it is a class C 255.255.255.0 network but it may not be so make sure you find out.
- The type of Encryption - will it be encrypted? Are you using ESP with 3DES or 256 bit AES? What are the SA timeouts?
- The Pre-Shared key if you intend to use on which is the secret code each Firewall uses to generate the encryption.
Now that we have the information we shall insert it into the necessary gaps. Go into you Vigor and go to the VPN setup page and then into a LAN-to-LAN profile that is free and give it a suitable name (I like the name of whatever is at the other end to keep things easy.)
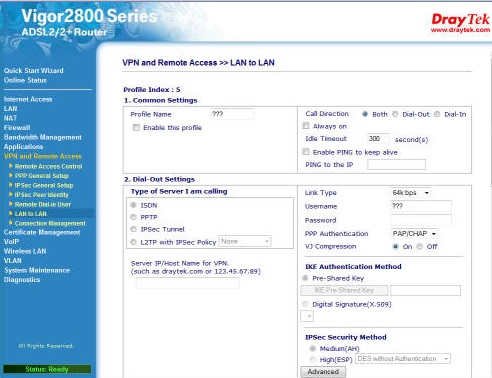
Now in our example we will use an IPSec tunnel which can be initiated by either end and so on the type of VPN we select 'both' top right. We do not yet tick the box saying 'enable this profile' as this will stop us being able get to the other end of the VPN as the Draytek simply encrypts all data bound for the endpoint as soon as we liven the profile. After selecting IPsec we then fill in the 'Server IP/Hostname' in the Dial-out setting section As soon as you have filled in the other endpoint IP (the external IP address of the Firebox) the 'IKE Pre-Shared KEY' button becomes active. You should now click on this button and enter your pre-shared key. Next you need to go down the page a little to the 'IPSec Security Method' section to choose your encryption method from AES/3DES/DES or unencrypted with SHA1 or MD5. In this example we shall use 3DES with SHA1 as there is no license for AES on my Firebox. We now click on the 'Advanced' button below to make sure of our settings.
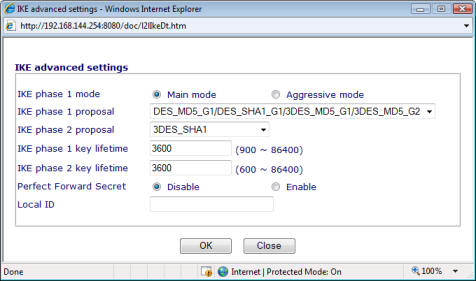
This page is where exactly how our firewall connects is decided and so we will choose simple numbers to be sure we can match them with the Firebox. The phase 1 and 2 values must correspond to those on the Firebox exactly. In my example I am choosing a 3DES SHA1 encryption of 3600 seconds for each of the IKE phases and am leaving Perfect Forward Secrecy disabled. After saying OK to this we are taken back to the LAN-to-LAN page.
Carry on down to the 'Dial-In' setting section where will fill in the section for the Firebox calling us.
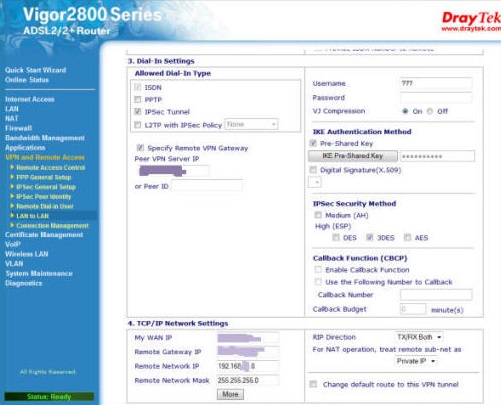
Select IPSec as your allowed dial-in type and then select your remote VPN Gateway IP. The pre-shared key button is again active and you should fill it in with your pre-shared key as before. Next choose whichever encryption your Firebox will support (3DES in my case) and then add the following at the bottom:
My WAN IP: The External IP of your firewall
Remote Gateway IP: The External IP of the Firebox
Remote Network IP: The LAN IP Address such as 192.168.6.0
Remote Network Mask: The Subnet mask of the Firebox LAN - 255.255.255.0 in this case
You can leave the RIP Direction set to both as the Firebox will not mind.
Now it is time to configure the Firebox. We will start in the Policy Manager, assuming you can get this far.
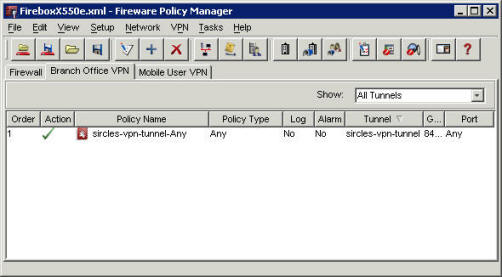
Go to the Brach Office VPN section and click on the VPN menu and select VPN Gateways.
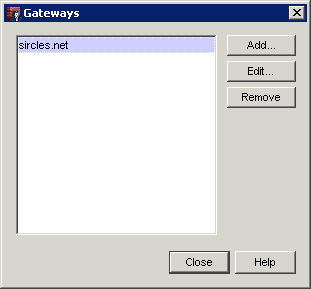
Add a new gateway with the external IP address of the Draytek:
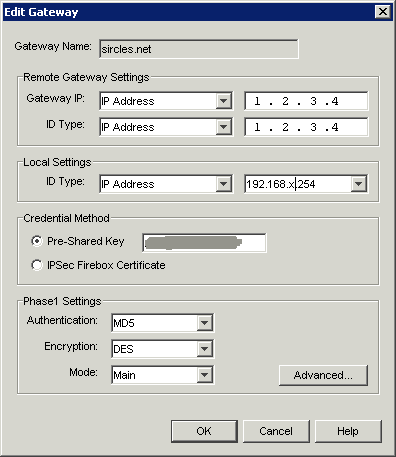
In the above example I am using DES as phase1 (at time of writing the present firmware picks up the tunnel quicker with DES) because the settings we added to the Draytek allow either but feel free to use 3DES and SHA1 here if you like. Say OK to all these settings to get back to the Policy manager.
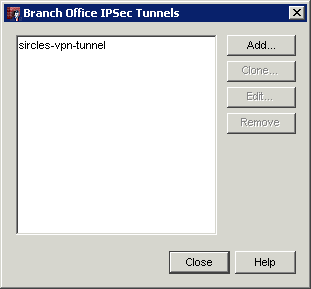
Now go to the VPN menu again and select 'Branch Office Tunnels and add a new tunnel.
Configure the new tunnel as follows:
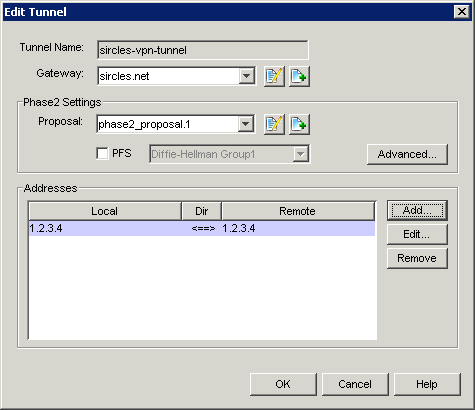
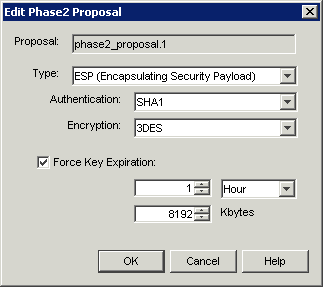
Select the Gateway you added and then the encryption type. If you click on the button with the pencil next to the phase2_proposal.1 you can stipulate the encryption type specifically as we did on the Draytek, below are the specific settings I am using:
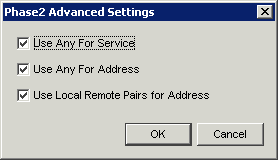
Click OK to get back to the previous screen and click the 'advanced' button for Phase2 advanced settings, then configure the following:
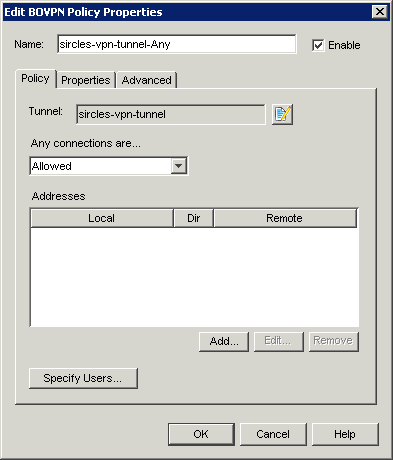
Now select OK to this and the previous screen and you are ready to add your policy rule by clicking the plus button on Policy Manager on the Branch Office VPN page. You must fill in the local LAN of the Firebox and the Remote LAN of the Draytek as 192.168.x.0/24 for a class C network or 172.16..x.0/16 for a class B etc.
Now you can say OK to all of the above and save your setup to the Firebox. You should then go back to the Draytek and add a tick to the LAN-to-LAN profile to enable it. Now try pinging any host on the internal LAN of the other network and you should see that you get a reply.